Jump to first occurrence of: [POWERPOINT]
 Both new and experienced PowerPoint
users will benefit from these tips, which will shorten your work time,
customize your content, and polish your presentations. We dug these
helpful hints out of PowerPoint 2003. Both new and experienced PowerPoint
users will benefit from these tips, which will shorten your work time,
customize your content, and polish your presentations. We dug these
helpful hints out of PowerPoint 2003.
1. Learn & Use Hidden Shortcuts
It's easy to miss shortcut keys that are hidden by default. To change
this, click the Tools menu and select Customize and Options. On the
Options tab, check Show ScreenTips On Toolbars. Below this is the Show
Shortcut Keys In Screen Tips command. If you check this option,
PowerPoint will display the shortcuts for toolbar commands when you
hover over them in order to see the name of the command.
2. Quick Text Box Picks
Open a new file and press CTRL-ENTER. This selects the title text box
on the first slide. Press the same key combo again, and the subtitle
text box on the first slide will be selected.
Things really
speed up when you press CTRL-ENTER a third time. This creates a second
slide and selects the title textbox. Press those two keys again, and
the subtitle textbox on this slide is readied for data entry.
The pattern continues each time you press CTRL-ENTER: PowerPoint
creates a new slide (based on the style selected on the master slide)
and highlights the title text box followed by the subtitle textbox. |
You can link a slide to a Web page, email address,
another file, or another page in the presentation.
|
3. Resize Graphics In Proper Ratio
Resizing a graphic is not usually difficult when done manually,
although you can use more precise tools. (Select Format and Picture and
then click the Size tab.) You simply click the object's holders and
move the borders up or down and out or in.
But if you want
to keep all the sides in ratio, hold down the CTRL key while moving a
border. As you do, the opposite border will move in the opposite
direction exactly the same amount. Do the same to the other borders, if
necessary, and you will successfully resize a picture in ratio.
4. Personalize Similar Presentations
Here's a quick way to personalize the text for similar slide shows without heavily editing the entire presentation.
Let's say you want to present a fundraising show you made for parents
whose kids play in a youth soccer league in one town to parents of kids
who play in a soccer league in another town. The first presentation
mentions the River City Youth Soccer 12 times in text boxes. Now you
want to change each mention to Red Falls Youth Soccer.
Like
Word, PowerPoint has a Find & Replace tool. From the Edit menu,
choose Replace. In the Find box type River City Youth Soccer. In the
Replace With box type Red Falls Youth Soccer and click Replace All.
5. Hide Your Slides
Another easy way to personalize presentations is to hide slides
intended for one audience but not intended for another. Click View and
Slide Sorter and then highlight the slide you want to hide. Open the
Slide Show menu and choose Hide Slide.
6. Insert & Customize Hyperlinks
You can turn any item on a slide into a link that will connect you to a
Web page, email address, another file, or another slide within the
presentation. Right-click the object and pick Hyperlink from the
context menu. In the Insert Hyperlink dialog box, select the type of
item you want to link to and, if necessary, enter the URL. |
Hiding an action button means
removing its color and outline.
|
The
object will link you to the item you just selected when you click it in
Slide Show view. You also can activate the link just by moving the
mouse over the item. To do this, right-click the item and choose Action
Settings. Pick the Mouse Over tab and check Hyperlink To. Then, from
the drop-down menu, either select the item to be linked to or enter the
address. Click OK.
7. Link Graphics Instead Of Inserting Them
You could have many reasons for displaying the same graphic throughout
your presentation—anything from clip art to a mugshot or even a
corporate logo. But what if you need to swap out the graphic while
keeping the rest of the presentation? If the graphic is linked to the
slide show instead of inserted into it, you can make a quick change.
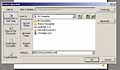
Click Insert, Picture, and From File. Locate and highlight the file you
need. Click the down arrow next to the Insert button and choose the
Link To File command. As long as you don't change the location of this
file on your system, PowerPoint will display this graphic even though
it's not inserted on a slide.
8. Hide Your Action Buttons
Action buttons are handy little devices that give directions to users
viewing a presentation alone. They inform the viewer that they have
options to jump to another part of the slide show or play an audio
clip, for example.
There's no reason you can't use them in
the presentations you make in person, as well. In those cases, however,
you may want to hide the action buttons to keep slides uncluttered.
Once you've created the button (click Insert, Picture, and AutoShapes
and then select Action Buttons), right-click it and choose Format
AutoShape. On the Colors And Lines tab, select No Fill For Color in the
Fill section and No Line For Color in the Line section. Click OK.
9. Slide Your Action Buttons
Instead of hiding action buttons, draw attention to them by customizing
their entrance onto the slide. Right-click the button and choose Custom
Animation. Choose the motion for how it will enter and, optionally,
exit the slide from the Add Effect menu. Then select the direction from
and speed at which it should move. |
You can add transparency a graphic item in its entirety, or you can make the adjustment gradually.
|
10. Add Notes
Adding notes to a printed copy of your slide show is a good way to keep
your oral and visual presentations in sync. To add notes, type your
text into the notes pane directly below the slide in Normal view. Then,
click Notes Page from the View menu to see how they will look when you
print the presentation. You can edit the notes from this view, as well.
11. Link Long Narrations
With the right
equipment (a sound card, speakers, and headset microphone) adding
narration to your slide show is fairly simple. (Choose Slide Show and
then Record Narration to get started.) But before you do, take note of
these hints.
First, PowerPoint will create a separate WAV
file for each slide to which you add narration, so place the
presentation in its own folder so that all the sound files will stay
together. Second, link to narration files instead of embedding them if
the presentation is long or if you plan to edit the narration later.
You'll see the option to do this before you start recording; enter the
name of the folder you just created as the source.
12. Add Transparency
You can add transparency to graphic items in two ways. One option
yields complete transparency. Select the item and then click the Set
Transparent Color tool on the Picture toolbar. Using the pointer, click
the color in the image you want to be completely transparent. This tool
works better on some photos than others, and it won't work on animated
GIF files.
The second option lets you choose the degree of
transparency, a good option for computer-generated art. Right-click the
item, choose Format, and select the Colors and Lines tab. Slide the
transparency bar to set the amount of transparency and then click OK.
13. Brand Your Slides
On slides with more text than graphics, your corporate logo could add
visual punch as a background. To brand a slide, insert the graphic,
right-click it, and choose Format Picture. Select the Picture tab, and
then choose Washout from the Color drop-down menu. Click OK.
Right-click the file and use Save As Picture to save the file. Then go ahead and delete the image from the slide.
Next, Choose Background from the Format menu, and in the box click the
arrow under Background Fill. Choose Fill Effects from this menu, and on
the Picture tab click Select Picture. Find and highlight the background
image you just created and click Insert, OK, and Apply. |
Embed the fonts you use in a slide show so that the type will display
correctly no matter what system plays the file.
|
14. Keep The Font
When you can't present your slide show on your computer, you run the
risk that another system will render your content differently than the
way you created it. Sometimes this occurs if the system playing the
slide show has not installed the font(s) in which you created the show.
If this happens, PowerPoint will use the next-best font available,
which can alter the spacing of elements on your slides.
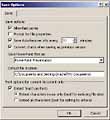
To
avoid this, send your fonts along by embedding them in the
presentation. Click File and Save As and open the Tools menu in the
Save As dialog box. Choose Save Options, and then check the Embed
TrueType Fonts option. (Embed only the characters in use if the
presentation won't be edited by those viewing it.) Click OK and then
save the slide show as a PPT file.
15. Loop Your Animations
You can loop any animated element once it's added to a slide. In Normal
view, pick Custom Animation from the Slide Show menu. Highlight the
animated object, and then click the down arrow next to the item you
want to loop in the Custom Animation pane. Choose Timing from this menu
and then enter the number of times you want the slide or animated
object to loop in the Repeat field.
16. Set Timings
Don't set timings for each slide until you've decided whether or not to
loop animations. Once that's done, you can set timings for each slide
while rehearsing the show, a good option if you plan to make an oral
presentation.
Choose Rehearse Timings from the Slide Show
menu. If you don't have looped elements, read your script and then
click the Advance button when you're ready to move to the next slide.
The clock will indicate how long you set each slide to appear.
If you have included looped elements in your presentation, remember
that clicking the Advance button starts the looping of each element on
a slide. Don't let too much time pass between launching each animation.
17. Open Your Presentations In Slide Show View
Because time is such a valued commodity, why not help your audience
save some of it by opening your presentations directly in the slide
show view? To do this, choose Save As from the File menu. In the Save
As dialog box you'll need to do several things. First, pick the
location on your hard drive to save the slide show. Next, enter a name
for your slide show. Finally, from the Save As Type menu, select
PowerPoint Show and then click Save. |

The Rehearse Timings tool allows you to determine the elapsed time
between when
elements of the
presentation move.
|
18. Get It Write
Sometimes you may need to interact with the contents of your slide
show. If so, use one of the writing utensils accessed via the pen logo
in the lower-left corner in Slide Show view. Choose a ballpoint pen,
felt tip pen, or highlighter, pick a color, and write on the slide as
needed. The same menu gives you access to an eraser, but you can also
discard all the markings when you close the presentation.
19. Go Blank
You may encounter the need to pause your presentation and would prefer
to display a blank screen in order to keep from distracting your
audience. Press the B key to display a black screen, and press the W key to display a white screen. Press the key again to restore your presentation to the screen.
20. Restrict Access
Microsoft Office 2003 comes with IRM (Information Rights Management), a
tool that lets you restrict the access and use of documents and emails.
Before you can use this tool, you need to download the IRM client.
Then, unless you work on Windows Server 2003, you will need to run a
trial IRM service from Microsoft.
The Permission button on
the Standard toolbar, to the right of the New command, can start the
process of setting up IRM. Once you've done that, choose Permission
from the File menu to determine not only who can access your PowerPoint
presentation, but also how they can use the content. 
by Rachel Derowitsch |
 Email This
 Both new and experienced PowerPoint
users will benefit from these tips, which will shorten your work time,
customize your content, and polish your presentations. We dug these
helpful hints out of PowerPoint 2003.
Both new and experienced PowerPoint
users will benefit from these tips, which will shorten your work time,
customize your content, and polish your presentations. We dug these
helpful hints out of PowerPoint 2003. 


